CSV file
Batches in Ashes can be either created from the
Batch window or imported from csv files in the
Batch manager. The recommended way to create a CSV file for a batch is
- generate a similar batch in Ashes in the Batch window
- export the batch to CSV from the Batch window
- modify the exported CSV file
The figure below is an example of a CSV file exported from Ashes

The columns of the file have the following purposes
- Load case set: defines the name of each of the load case sets in the batch
- Load case: defines the name of each of the load cases in the batch
-
Enabled: either 1 or 0. If a value of 0 is set, the load case or load case set will not be run.
Note: if the Enabled value of a Load case set is 0. all the Load.cases in this Load case set will not be run -
Duration: sets the duration of the load case set
Note: the duration of a Load case is defined by the duration of the Load case set it belongs to. It is not possible to set different durations for Load cases within a Load case set. - Rec. time step: sets the frequency with which the output is written to the text file. A value of 1 means that every time step is recorded, a value of 2 means that every second time step is recorded, etc.
- Sensors: specifies which sensors are present in the model. This defines what data will be recorded during the simulation.
- Jobs: defines the number of simulations that will be run for a given load case. This is typically used when running simulations with turbulent wind. If the Seed of the turbulent wind is set to Random, different realisations of a turbulent wind condition can be run with this parameter.
-
Simulation parameters: any parameter from any
Parts can be modified in the batch. To know the name of a parameter, the suggested procedure is to add the parameter in the
Batch window and to export the CSV file.
Note: when the parameter is a file path (for example the path to a Python script, or to a support section input file), you can write either an absolute path or a relative path. If you write a relative path, it will be relative to the csv file
1 Sensors
It is possible to run different load cases with different sensors by specifying a Sensor list in the
Sensor column. A sensor is defined by a string formatted as follows:
SensorType@CustomName@Part@ExtraInfo
The string contains four parameters:
- SensorType is the type of sensor, automatically generated by Ashes
- CustomName is the name of sensor set by the user
- Part is the part that the sensor belongs to
- ExtraInfo enables you to specify certain parameters for the sensor, as is the case for the Fatigue sensor
You can see the string defining any sensor by
- adding a sensor to your model in time simulation
- going to the Batch manager
- creating a new batch
- exporting the batch (see Batch window)
- adding a sensor to your model in time simulation
- going to the Batch manager
- creating a new batch
- exporting the batch (see Batch window)
If you open the csv file, you will then find the string under the
Sensor column, as illustrated in the image below:

Note: not all parameters of the sensor string are always necessary. In the example above, there is no custom name or extra information
1.1 Examples
The default
Generator
sensor, available when you open any default template, will be defined by the string
GeneratorElectrical@@Generator: Variable speed@. The sensor type, as defined by Ashes, is
GeneratorElectrical, and the sensor belongs to the part
Generator: Variable speed
It is possible to get this information by hovering the sensor in Time simulation, as illustrated in the image below
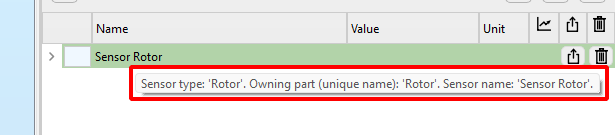
In this example, the sensor type is
Rotor, and this sensor belongs to the part
Rotor. The sensor string will therefore be
Rotor@@Rotor@.
The rotor part also has a sensor called
RotorAero (see
Rotor [Aero] sensor). The string for this sensor is thus
RotorAero@@Rotor@.
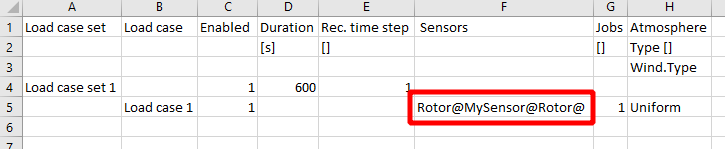
In the examples above, no custom name was set. If you rename the rotor sensor to
MySensor, the string will now be
Rotor@MySensor@Rotor@, as illustrated in the image belowe:
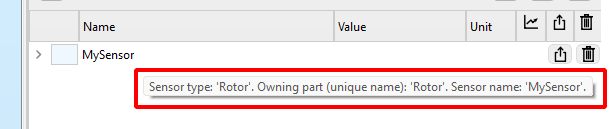
When hovering the sensor name, you will now see the following information:
Note that even though most sensors belong to a part, that is not the case for all sensors. Special sensors (see
Adding a sensor) have no owning part. For example, for a
Solver sensor without a custom name, the sensor string will be
Solver@@@.
Some sensors accept extra information to specify necessary or optional parameters. This is the case of the
Fatigue sensor.
The string for a fatigue sensor placed on the lowest element of the monopile of the default onshore model will be
Fatigue@@Element 1 | Tubular tower@EurocodeEN1993$SN100$0.1$i$0#90#180#270$1#1#1#1.
The last parameter of the sensor string (after the last @ symbol) corresponds to extra information that defines some fatigue calculations parameter.
Different sensors must be separated by the
& symbol, for example
Rotor@@Rotor@&Generator@@Generator: Variable speed@&Solver@@@.
Note: if your model has input text files (such as
Support section files) and you have defined sensors in the text files, you do not need to add them again to the CSV file, Those sensors will be added to the batch model automatically.
If a sensor is specified both places with different parameters (for example a fatigue sensor), the parameters from the csv file are used.
If a sensor is specified both places with different parameters (for example a fatigue sensor), the parameters from the csv file are used.
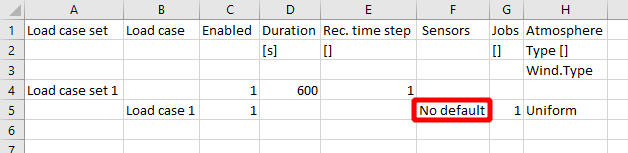
If the
Sensors column of the CSV file is left empty, a set of default sensors will be added to the model. If you don't want the default sensors to be added, you can write
No defaults in the sensors column, as illustrated in the image below:
2 CSV file delimiter
If you are using Excel to open your batch files, you need to make sure that the delimiter that Excel uses for CSV files is the
semicolon ';', since that is the one Ashes uses when exporting the files. If the delimiter is something else, the columns of the batch will not be interpreted by Excel as columns, making it much harder to visualise and work with the CSV file.
We have made a video explaining what the problem is and how to solve it, that you can watch here:
https://youtu.be/AgVHHvBZDXM
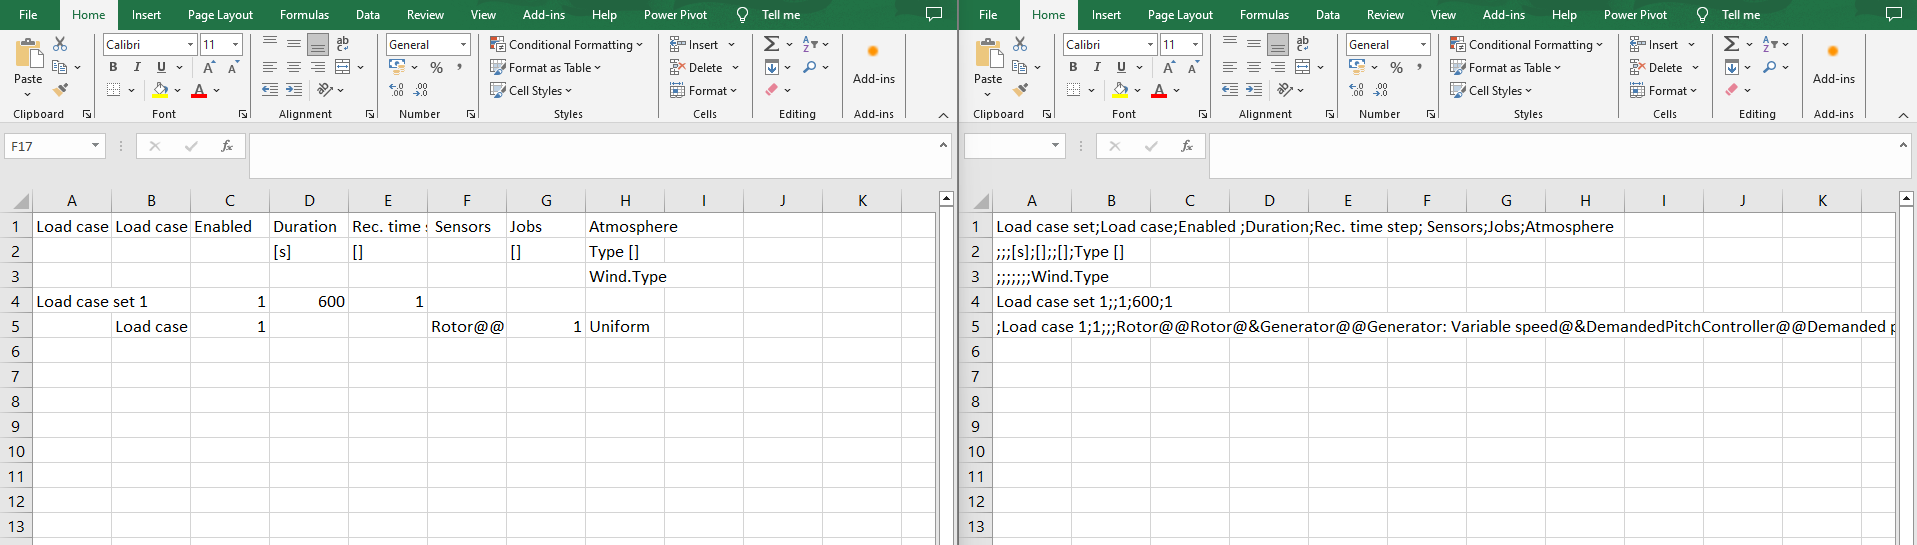
The image below illustrates the issue: for the file on the left, Excel is correctly interpreting the semicolon as the delimiter, which results in neatly separated columns of data when opening the file. On the contrary, in the file on the right, Excel does not interpret the semicolon as the delimiter and thus the columns are not displayed as expected.
To get the correct delimiter set in Excel, you need to change your Operating System (OS) global settings. You can do that either through Ashes or through Windows.
2.1 Changing the settings through Ashes
Ashes can automatically detect whether your OS has semicolons as the delimiter. To check that you have the recommended settings, open the
Preferences and go to the
formatting
tab. The
System delimiter/separator
section will display a message depending on the gloabl setting. In the image below, the delimter in the global settings is set to
comma ',', which is not recommended.
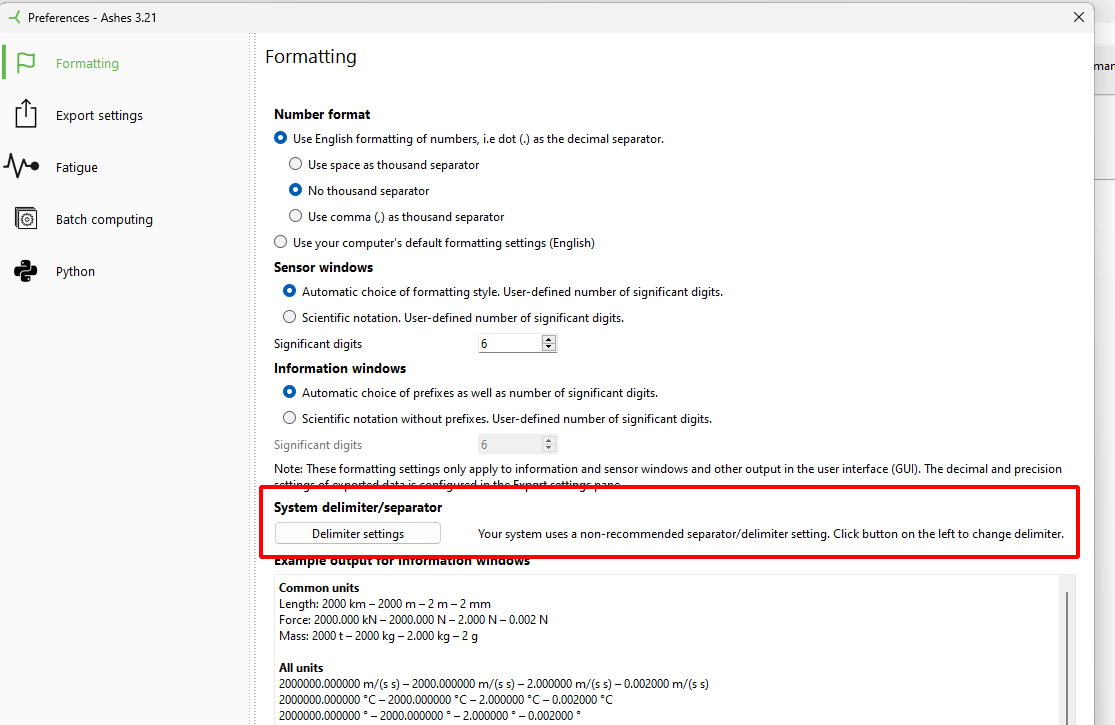
To change the settings, simply click the
Delimiter settings button and select
Set delimiter to semicolon.
Note: if the delimiter is not set to semicolon, you will get a warning when exporting a batch to a CSV file. Simply click
Go to preferences and follow the steps above
2.2 Changing the settings throuh Windows
-
In the
Search bar, type
Region and press enter
- Click Additional settings
- In the List separator field, enter a semicolon (:)
- press apply