Batch window
When opening an existing batch or creating a new batch, the batch window is opened. The image below shows the different parts of the batch window.
A batch contains two types of information:
-
the
default
model that the simulations will be run with. This is the model that was loaded in the simulation window when the batch manager was opened, and the parameters from this model will be modified according to the batch. For example, you can open the onshore template and then create a batch: the model in your batch will have three blades. You can then add a parameter in the batch to have batch simulations with different numbers of blades
Note: if you create a batch, the default model will be set. Even if you close your batch and go back to the time simulation window to modify the model, the batch initially created will still have the same default model. If you want a new default model, you'll have to create a new batch.
-
the load case parameters. When you create load cases, you can specify which parameters from the default model (including environmental conditions) will be modified.
Note: batches are automatically saved as you create and modify them. If you close Ashes, your default model and the load case parameters will be saved for when you open Ashes again
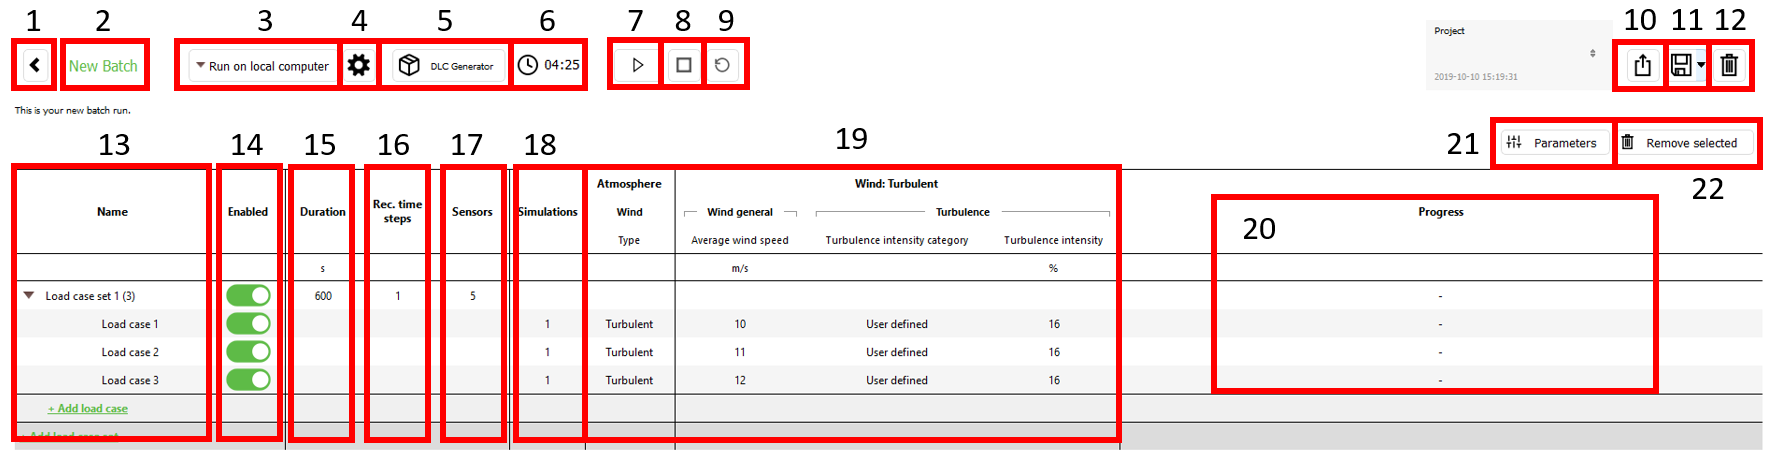
1 Description of the batch window
The function of each part of the batch window is given in the list below
- Back button: return to the Batch manager
- Batch name
- Local/cloud batch: here you decide whether the batch will be run on your local computer or on the cloud. See Cloud computing for more info on how to run batches on the cloud.
- Settings: enables you to change the settings of the batch run. See the Batch settings section below for more information
- DLC Generator: opens the DLC generator for quick generation of standardized design load cases (such as IEC load cases, see DLC - Design Load Case)
- Estimated run time: provides an estimation of the time the simulation. Note that this estimation does not include the generation of the turbulent wind field (when applicable)
- Start/Pause a batch
- Stop a batch
- Restart a batch
- Export a batch to a CSV file
- Save/ Save as a batch. This feature has been discontinued. Batches are now save automatically.
- Delete a batch
- Load case sets and load cases: a batch is generally divided into different load case sets, and each load case set can contain different load cases.
- Toggle load cases: this switch enables you to toggle on and off load case sets and load cases
- Duration: specifies the duration of all load cases within a load case set
- Recording time steps: choose which time steps will be recorded. For example, if the time step of the simulation is 0.025 s but you only want to keep data for every 0.05 s, this value should be set to 2. If the value is set to 1, all time steps are kept.
- Sensors: number of sensors in the model. Once the batch is defined, the number of sensors cannot be changed anymore.
- Simulations: number of realizations of the current load case with different seeds for the turbulent wind.
- Parameters: all the parameters and their values are specified here. See the Batch parameters section below for more information. Note: you can right-click a parameter if you want to apply its value to all load cases.
- Progress: When the batch starts, here is where you can check the progress of each load case and load case set
- Display parameters: this opens a menu where you can select which parameters are changed within the batch. See the Display parameters section below for more information
- Remove selected: enables you to remove the selected load case sets or load cases.
Note: when creating a batch from a model, the model and its sensors are locked within the batch. That means that once the batch is created, going back to the model and changing it or adding new sensor will not affect the batch.
2 Batch settings
When opening the batch settings, you will be prompted with a dialog with three tabs:
2.1 General
This tab enables you to change the name or the description of the batch
2.2 Results
4 options are given in this tab:
- Save results to: specify the path where the results will be saved
- Save model: if toggled on, this will save an ashes model for every load case that is run in the batch. This is useful to check what the model and the environmental conditions were for each load case
- Save batch export file: if toggled on, this will save a .csv file with all the information of the batch. This file can then be directly imported to create a batch with identical parameters
- Keep turbulent wind files: if toggled on, the turbulent wind files generated during the batch will be kept. The turbulent wind files are generally large, so this is turned off by default to save space. You might want to turn it on if you are going to run a batch with the same turbulent wind. This will enable you to reuse these files and therefore not have to generate them again.
- Store sensors results in binary format: if toggled on, the results will also be saved in binary format. Note that the results from a Fatigue sensor will always be stored in binary, as this is necessary to write the fatigue report.
2.3 Cloud
When running batches on the cloud, this will give you the cloud ID of the batch. This ID is then used to locate the results once the batch is finished. See
Cloud computing for more info on how to run cloud batches.
3 Display parameters
When clicking on the
Display parameters icon
 , the following pop-up window is opened:
, the following pop-up window is opened:
This window enables you to select the parameters that will compose your batch. When selecting parameters on the parameter list, these will automatically appear on the
Parameters section of the batch window. The
Diplay parameters window has the following parts:
- Views: a view is a combination of parameters. This box tells you what the current view is.
- Save/delete views: if you want to keep a combination of parameters for future batches, you can save the view with these buttons
- Views list: the views that have previously been saved are available here
- Parameters search: this box enables you to search for any parameter
- Parameters list: all parameters that can be included in a batch are listed here. The parameters are gouped according to the parts composing the model. Note that some parameters can only be modified for certain values of other parameters. For example, in order to be able to modify the characteristics of an irregular sea state (significant wave height, spectral peak period, etc), it is necessary that the wave type is set to Irregular.
4 Running the batch
Once the batch is set, press the play icon in the batch controls to start the batch. Ashes will automatically parallelize the different load cases and optimize the number of threads that can be run simultaneously. While the batches are being run with Ashes, you can use your computer normally. You can check the progress of the batches in the
Progress area.
Do not close Ashes while you are running local batches, as this would cancel the batch run. Only cloud batches will continue to run when Ashes is closed.
5 Batch results
Once the batch is over, you can press the
Open results folder
button to view the results (shown in the picture below).

Clicking on this button will automatically open the folder where the results from the batch are saved. One folder will be created for each load case set, and within this folder, one folder is creayed for each load case. The results for all sensors are in the load case folder. In the batch folder, you can also find a
batch log
text file that contains information about how the batch was run.
6 Batch errors
If an error occurs during the computation of a load case, the text
Failed (hover for description) will appear in place of the progress bar. Place your mouse over the error message to get details about the error, as shown in the picture below. The error message can also be found in the batch log

When an error occurs during a batch simulation, it is often convenient to run the exact same simulation in the
Time simulation window to visualize the model and get a better understanding of what can have caused the error.