Your user account
To use Ashes, you need to create an account. You can use your account to log in to Ashes in any computer, store models thanks to the
Cloud storage functionality, use
Cloud sharing to share your models with other Ashes users, use our
Cloud computing capabilities or ask questions in our forum here
https://www.simis.io/Q-and-A/.
You can access your account from the Simis website going to
https://www.simis.io/account/
or by clicking on the
 icon from the
Starting window and selecting
Show profile, as shown in the figure below:
icon from the
Starting window and selecting
Show profile, as shown in the figure below:
icon from the
Starting window and selecting
Show profile, as shown in the figure below: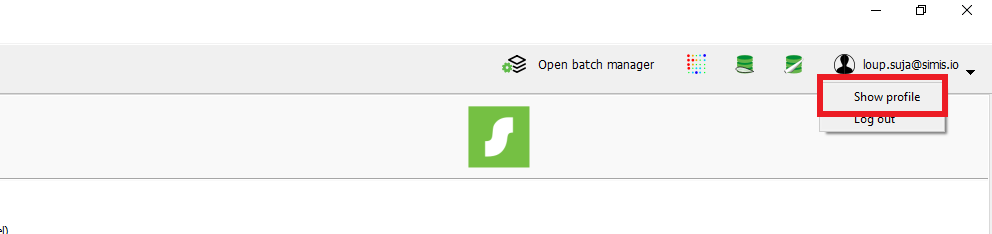
Clicking on
Show profile or going to the
https://www.simis.io/account/ will bring you to your user account. From your user account you can access the following information:
1 General
1.1 My profile
General information about your account. Here you can change your credentials and set a nickname to be used in the forum. Note that if no nickname is given, you will appear anonymous by default.
1.2 License
Information about your license and cloud storage capacity.
2 Cloud
2.1 Cloud storage
This section gives you access to the models that are stored in the Ashes cloud. For more info, see
Cloud storage. You can also share your cloud models from this page. For more info, see
Cloud sharing.
2.2 Cloud computing
This section summarizes your current status on cloud computing. Here you will see a list of all the cloud batches tat you have run so far, as well as your total cloud computing time and spendings. If you do not have access to the cloud computing features yet, get in touch with us at support@simis.io.
Note: The spending shown here should correspond to your use of cloud computing, but the actual cost is what will be displayed in the billsent to you at the end of the month. If you are unsure of what your spendings are, please get in touch at support@simis.io
3 Company account
Note that you will only have this section if you have an Industry or an Education license and are
Administrator or
Moderator of your company account (see the
Manage users
section below).
3.1 Data
This section enables you to change the information about your institution
3.2 Invite users
This section enables you to add new users to your company group. You add a user by sending them an invitation with a message that you write to their email address, that they can accept or ignore. Opening the
Invite users
section shows the following window on your browser:
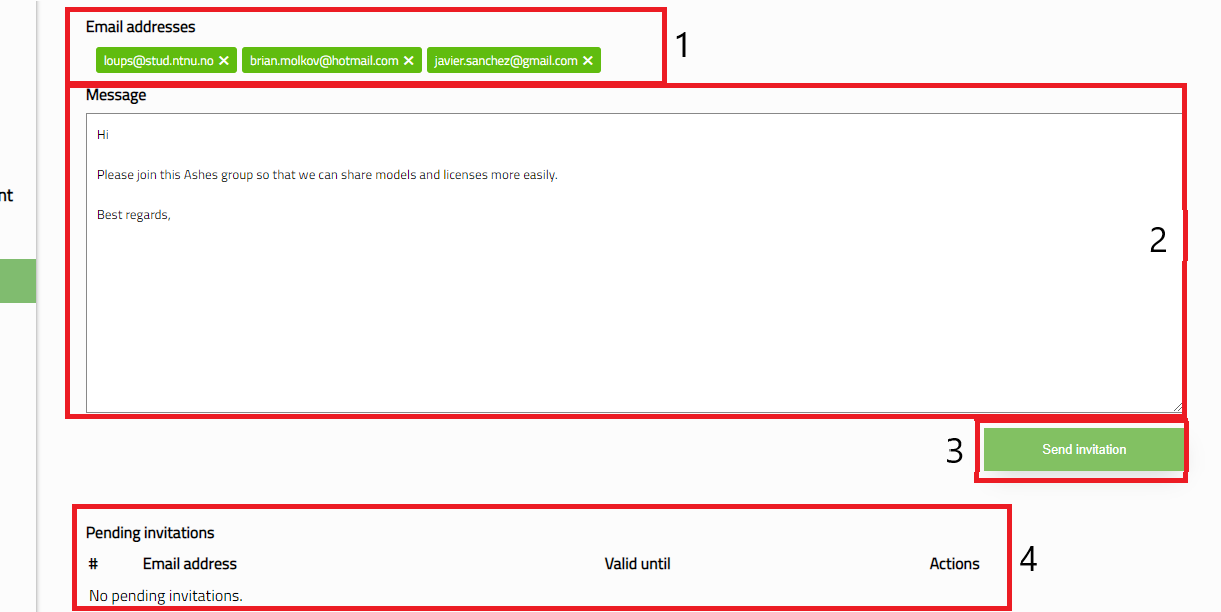
The functionalities of the different parts of this window are explained below:
- Email addresses: type in one or many email addresses of the users that you want to add to the group
- Message: this is the message that will be displayed in the invitation they will receive
- Send invitation: once the invitation is ready, click this button to send the invitation to all the email addresses you entered
- Pending invitations: here you will see the invitations you have sent but that have not been accepted yet.
Once the invitatios have been sent, you will get the following message:

Note:
- if an email address is not associated to an active user of Ashes, they will still receive the invitation. However, they will only appear in the group once they create an account
- users in the group can have different roles (see the Manage users section below). By default, new users are added as Members
- a user cannot be part of more than 1 group
The users you send an invitation to will receive an email from
noreply@simis.io.
If they already have an account, the email they receive will be as follow:
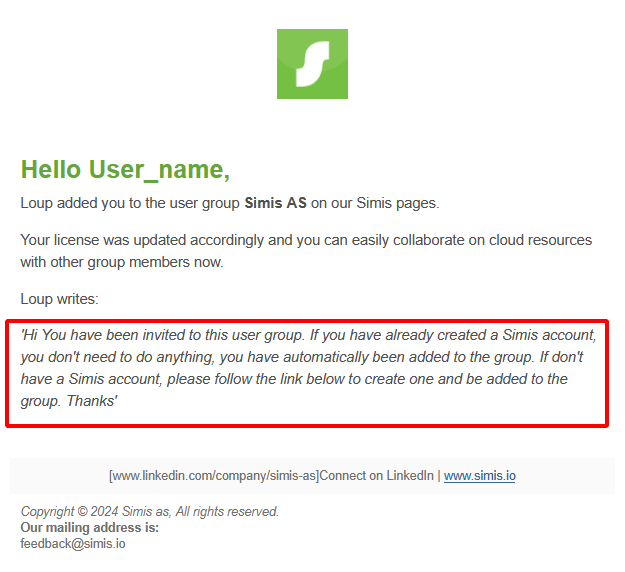
The text in the red rectangle corresponds to the text you entered in the
Message box.
They will automatically be added to the group and they will not appear in the list of pending invitations.
If they do not have an account yet, they will receive the following message:
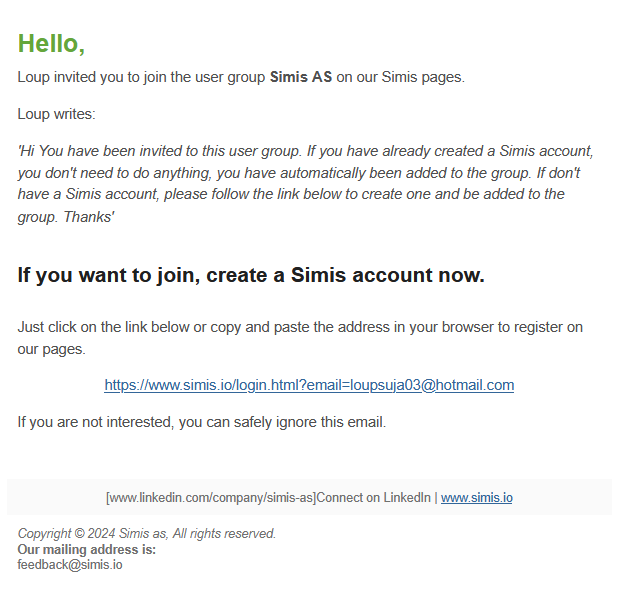
They will appear on the
Pending list until they create an account.
3.3 Manage users
In this section you can see the users in your group. You can also change their roles within the group o remove them. Opening the
Manage users section opens the following window in your browser:
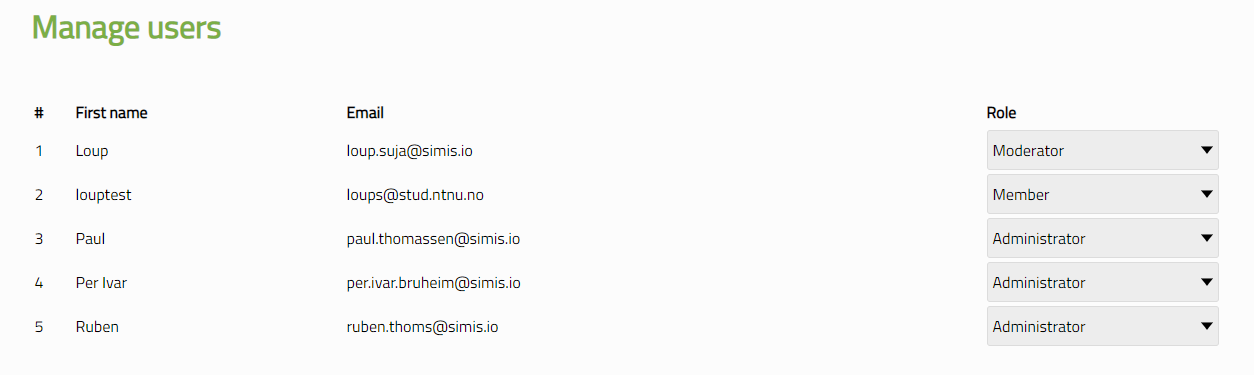
Here you can see a list with the users that are in the group and their email addresses. In addition, each user has a role within the group, that you can see by clicking on the
Role button. Clicking this button will open a dropdown menu with 4 options:
- Administrator: Grants the user administrator rights to edit the company account, manage and invite users.
- Moderator: Grants the user moderator rights to manage and invite users but not change their rights
- Member: Makes the user a member of the user group without any administative right
- Remove: Removes the user from the group.