Note that if no geometry is specified for an airfoil, the geometry of a NACA 2425 will be used for the 3D visualization of the blade and this will not affect the simulations.
If no polar is defined, you will not be able to use the airfoil in a blade. You can generate a polar from the geometry using Xfoil (see section below).
Airfoil database
This section explains how the airfoil database works. To see how to create and use an airfoil, you can also check this video:
https://www.youtube.com/watch?v=lIBihrfV2wU
The
airfoil database
contains the airfoils that come with Ashes by default plus all the airfoils that you have used with Ashes. In Ashes, an airfoil can contains two main sets of data
- Polars: a polar is a table that lists the aerodynamic coefficient ( Cl, Cd, Cm) as a function of the angle of attack. These coefficients are used to compute the aerodynamic loads. See the Airfoil polar file for more information
- Geometry: the geometry gives the shape of the airfoil. It is used for visualizing the arifoil and to compute the polars with Xfoil (see section below). See the Airfoil geometry file for more information.
You can open the airfoil database by clicking the
 icon in the upper-right corner. The figure below shows the main window of the airfoil database.
icon in the upper-right corner. The figure below shows the main window of the airfoil database.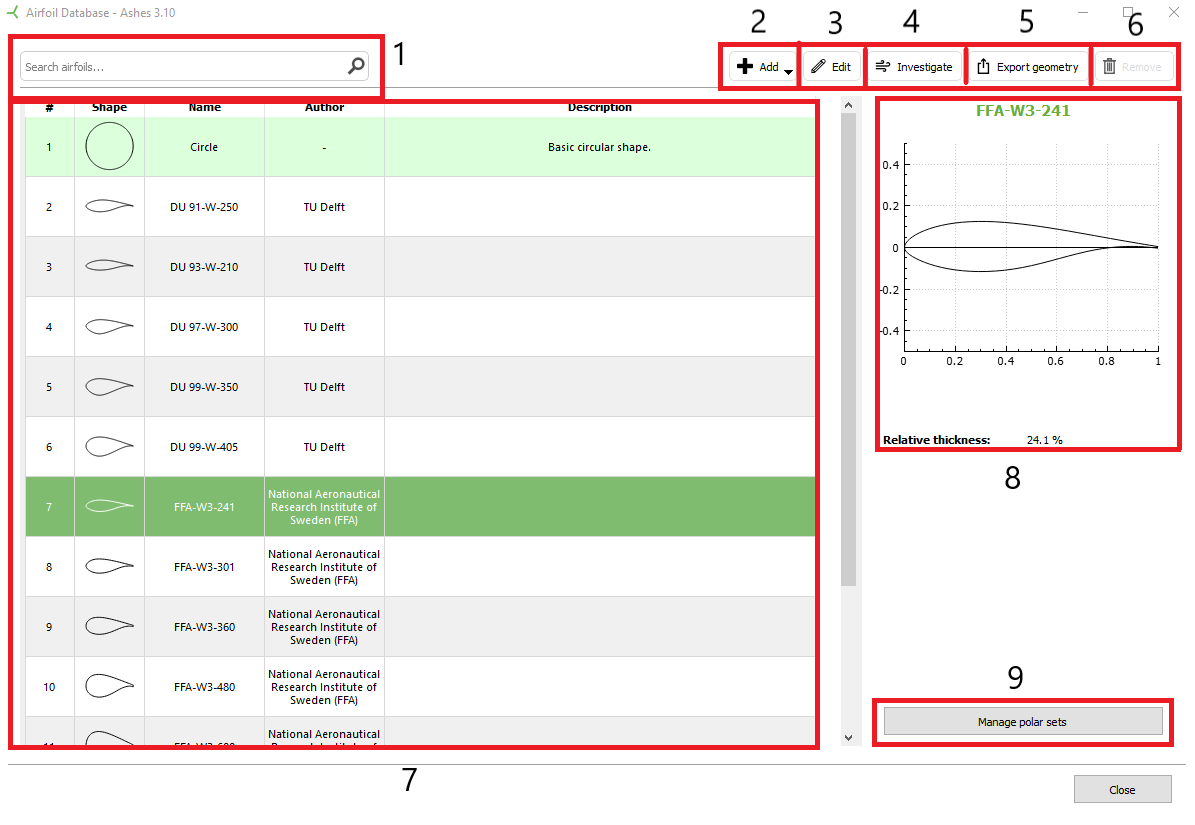
The different parts and functionalities of this window are listed below:
- Search bar: looks for airfoils by typing their name
- Add: adds new airfoils. See section below on the different ways to add an airfoil
- Edit: changes the Name, Author or Description of the selected airfoil. It is also possible to edit the geometry of airfoils that you have added (but not for the default airfoils)
- Investigate: computes the pressure curve of the selected airfoil using Xfoil. Note that only polars with a geometry can be investigated. See section below on how to investigate an airfoil
-
Export geometry:
exports the shape of the selected airfoil to an
Airfoil geometry file
Note that the geometry of the DU airfoils from the NREL 5 MW blade are confidential. Even though they are correctly shown in Ashes, it is not possible to export their geometry.
- Remove: deletes the selected airfoil. Note that the airfoils that come by default cannot be deleted
- Airfoil list: gives a visualization of the shape, the name, author and description of all airfoils in the database. Note that if an airfoil does not have a geometry, no shape will be displayed
- Overview: shows the name, shape and relative thickness of the selected airfoil
- Manage polar sets: enables you visualize, add or delete polars for the selected airfoil. See section below on how to manage polar sets.
1 Adding new airfoils
There are three ways to add a new airfoil.
1.1 Create new
Selecting this option opens a pop-up window where you can enter the name, description and author for the new airfoil (by default, the author name is set to your username). You can also define the geometry of this airfoil as a copy of the geometry of any other airfoil within Ashes.
Note that by default, a created airfoil does not have any polar, so you will not be able to use it for a time simulation
1.2 Import from geometry file
This option creates a new airfoil with a geometry defined by an
Airfoil geometry file. A pop-up window will open for you to enter the name, description and author of the airfoil.
Note that by default, this airfoil does not have any polar, so you will not be able to use it for a time simulation
1.3 Import from polar file
This option creates a new airfoil with a polar defined by an
Airfoil polar file.
A pop-up window will open for you to enter the name, description and author of the airfoil.
2 Investigate an airfoil geometry
Ashes uses the software Xfoil (
http://web.mit.edu/drela/Public/web/xfoil/) to compute the pressure curves around an airfoil. Xfoil uses the geometry to generate results, so this option is only available for airfoils with a geometry. Clicking the
Investigate button opens the following window:
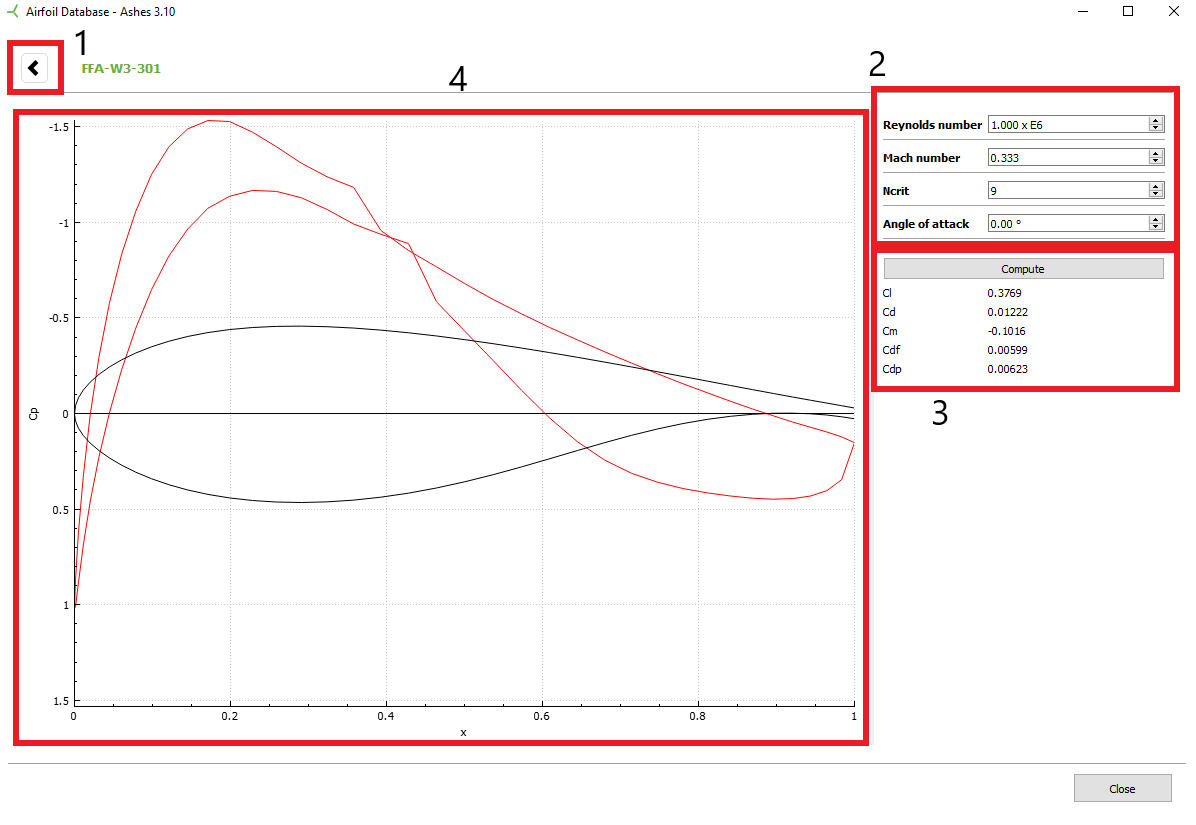
- Back button: go back to the airfoil database
-
Parameters:
parameters for the Xfoil computation.
Ncrit (short for Ncritical) is a parameters that refers to the disturbance in the flow where the airfoil operates. A value of 9 corresponds to a standard wind tunnel. Read the Xfoil manual for more details here http://web.mit.edu/drela/Public/web/xfoil/xfoil_doc.txt
- Compute: clicking this button will start the Xfoil computation. Below the button you can find some of the results of the computation
-
Cp window: here you can see the pressure distribution (in red) around the airfoil (in black)
The Cp coefficient here corresponds to the Pressure coefficient, and is not related in any way to the Power coefficient, generally also called Cp and used for example in the Rotor characteristics
For some parameters, it is possible that the XFoil computation does not converge. In that case, instead of getting results, an error message saying
Computation failed! will appear. You can try to click the
Compute button again to continue the iteration process and see if convergence is achieved. If not, then XFoil cannot solve your simulation. More information is provided in the theory manual here:
Xfoil.
3 Manage polar sets
For an airfoil to be used in an aeroelastic simulation, it has to have at least one polar. It is also possible to define multiple polars (for eaxmple with different Reynolds numbers), which can be grouped in a polar set. An airfoil can therefore have one or more polar sets, each with one or more polars. When clicking the
Manage polar sets button, the following window is opened:
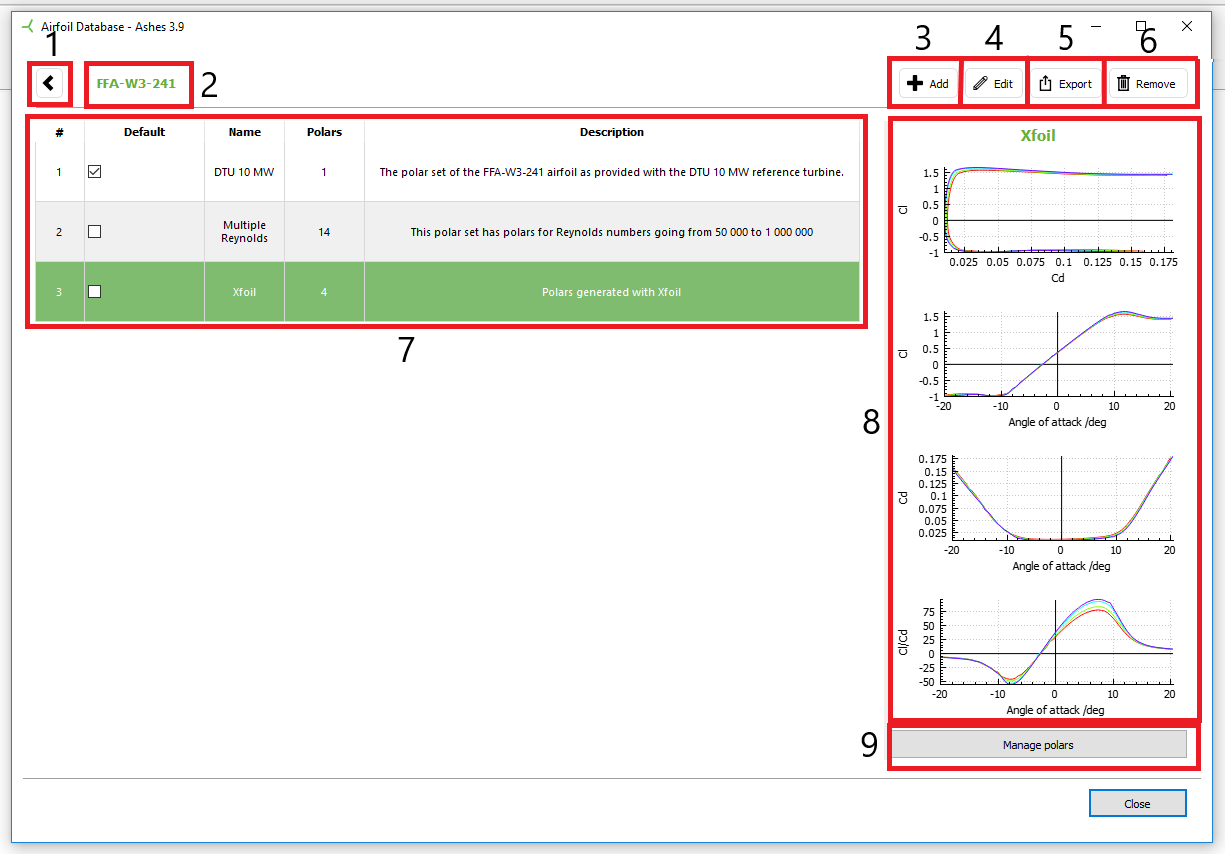
- Back button: go back to the airfoil database
- Current airfoil: airfoil for which the polar sets aare being viewed
- Add: add a new polar set. When adding a new polar set, it will not contain any polars by default. To add polar to the newly created polar set, click the Manage polars button
- Edit: change the name or the description of the selected polar set
- Export: export the current polar set to a text file (see Airfoil polar file for more info)
- Remove: delete the selected polar set
- Polar set list: shows all the polar sets available for the current airoil. The Default box enables you to select the polar set that will be used by default when a blade uses the current airfoil. The Polars parameter tells you how many polars the corresponding polar set contains.
- Polar curves: shows you the polars of the selected polar set
- Manage polars: enables you to add/ modify/ remove polars in the selected polar set
Note: to change the polar set used by an airfoil during a time simulation without definig that polar set as default, click the
 icon in the top ribbon (see
Simulation window). This will open a dialog with all the airfoils used by the current model and a dropdown menu for each of them that allows you to select the desired polar set.
icon in the top ribbon (see
Simulation window). This will open a dialog with all the airfoils used by the current model and a dropdown menu for each of them that allows you to select the desired polar set.
If a polar set is set to default, it will be applied the next time a model that uses this airfoil is created. That means that if you have a model opened and then change the polar set to default, this model will still use the polar set it was created with, unless you change it with the
icon
To add, modify or remove polars from a polar set, click the
Manage polars button or double click on the polar set name. This will open the following window:
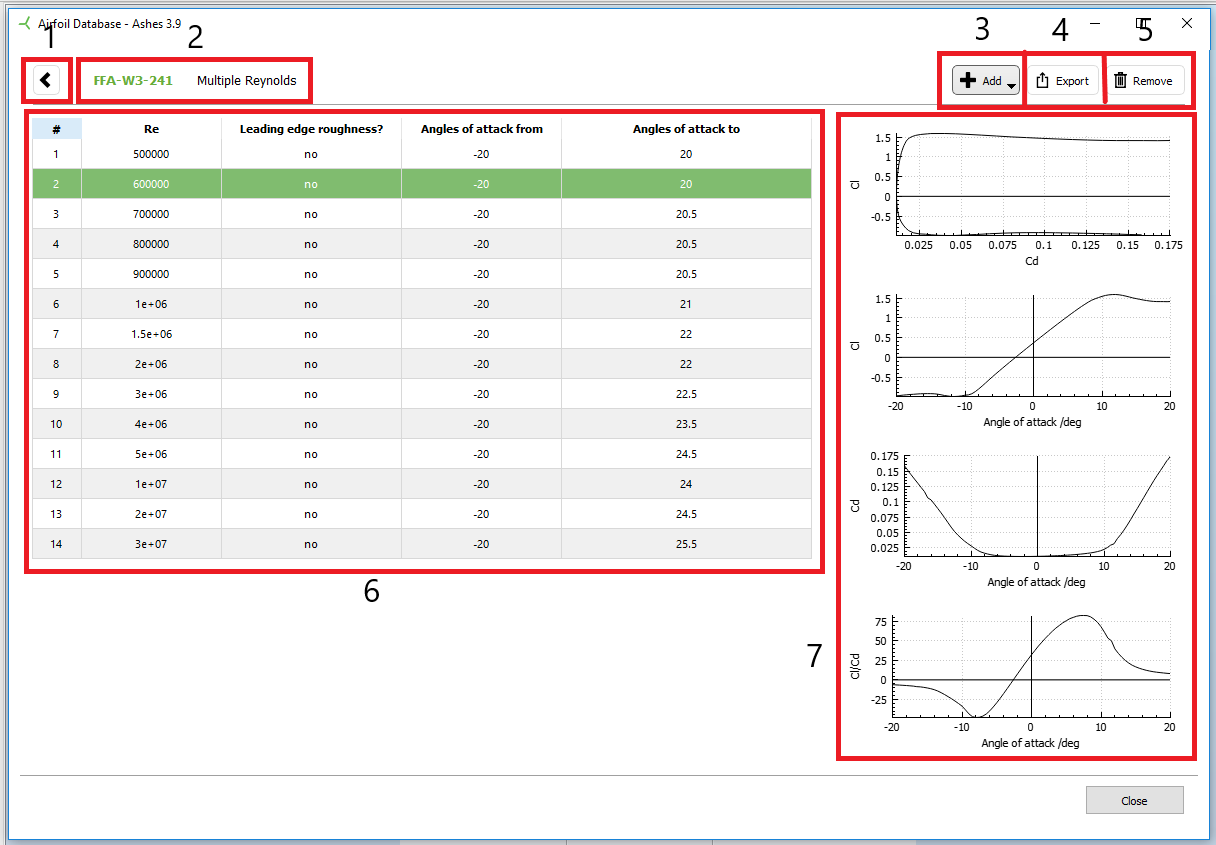
- Back button: go back to the polar sets window
- Current polar set: airfoil and polar set that contain the displayed polars
- Add: add a new polar. Two options are given, explained below
- Export: export selected polar to a text file (see Airfoil polar file for more info)
- Remove: delete the selected polar
- Polar list: shows all the polars available in the current polar set. If no Reynolds number has been specified for a polar, the text Unknown is shown. The list also specifies whether the polar was created assuming a Leading edge roughness and the range of angle of attacks for which the polar is defined
When adding a polar, two options are available:
3.1 Importing from a polar file
This option enables you to import a polar from your computer. The polar has to be in the format of an
Airfoil polar file.
3.2 Creating polars with Xfoil
This option enables you to compute the polars directly using Xfoil. Selecting this option opens the following window, which lists the Xfoil computations:
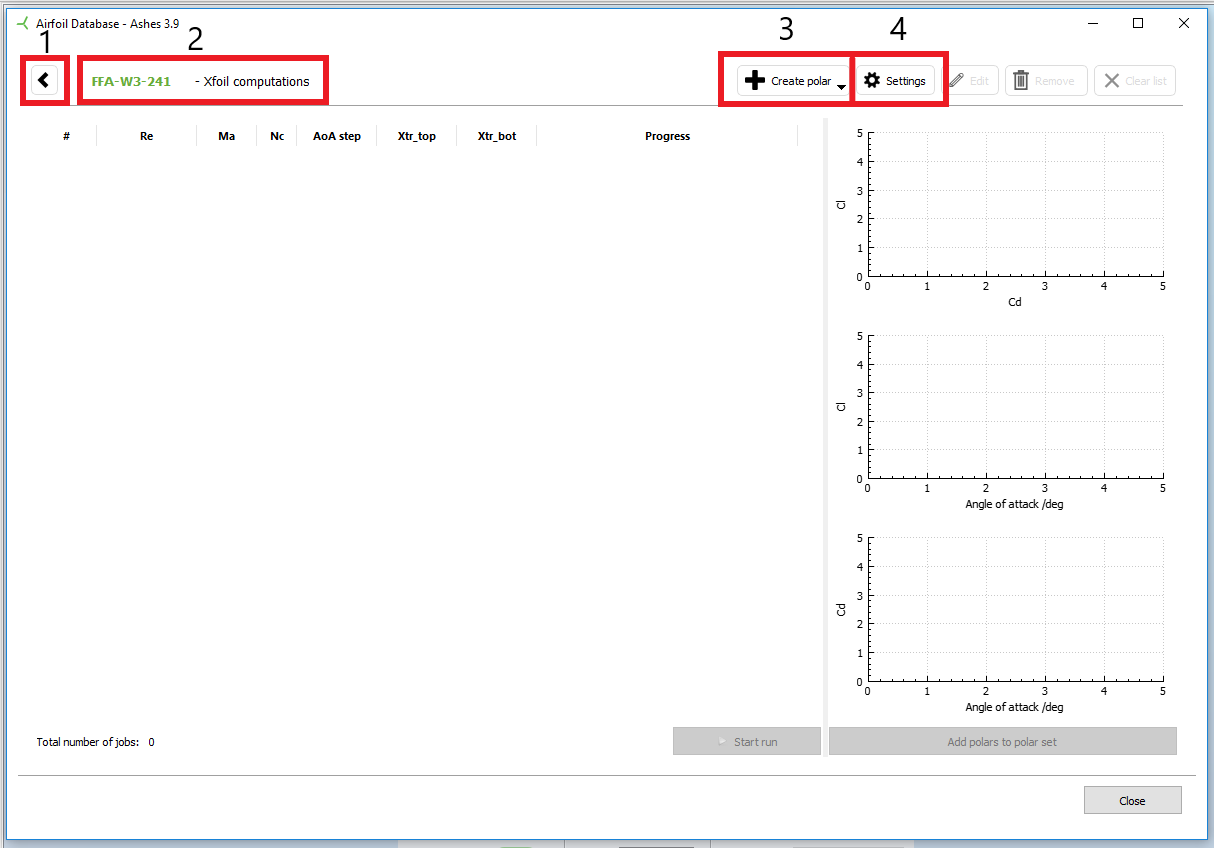
- Back button: go back to the polar sets window
- Current polar set: airfoil and polar set that contain the displayed polars
- Create polar: add a new polar. Two options can be chosen to add a new polar, described below
- Settings: in the settings you can tick the option Allow trailing edge adjustments. This option can improve the convergence of the Xfoil computation.
To add a new Xfoil computation, you can chose one of the two following options
3.2.1
Create custom polars
This option enables you to define the parameters of the Xfoil computations for the desired polars. Selecting this option opens the following window

For a detailed explanation of the parameters please refer to the Xfoil user guide. Once you have defined all parameters, click the
Add button to add the computation to the Xfoil computation list. Once you have entered all the desired computations, click th close button.
3.2.1 Create default polars
This option fills the Xfoil computation list with a predefined set of parameters, with varying Reynolds numbers and forced transitions.3.2.2 Running Xfoil computations
Once all the computations have been defined, the window will display a list as follows:
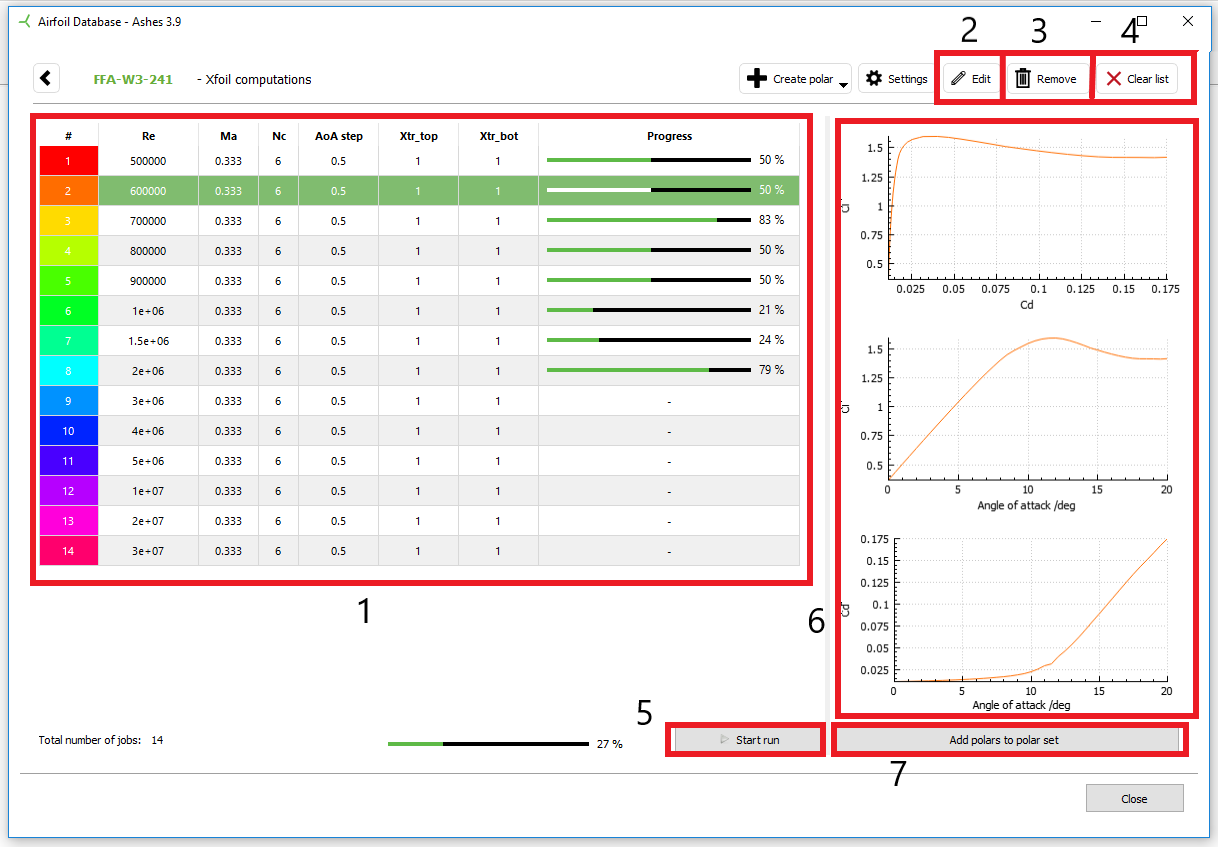
- Xfoil computations list: all the computations that have been defined for this polar are listed here. The parameters for each computation are shown, and a progress bar appears once the computation is started
- Edit: change the parameters of the computation
- Remove: remove the selected computation
- Clear list: remove all computations
- Start run: starts computing airfoils for the whole list
- Polar graphs: shows the polar graphs obtained for each computation
- Add to polar set: once the computation is finished, this button adds the computed polars to the polar set
In some circumstances, the Xfoil computation cannot converge, in which case a pop-up window with an error message will appear. In this case you can try with different angle of attack steps, or allowing for trailing edge adjustments in the
Settings